Chapter 3 Database connections
![]()
Snowflake is the chosen data cloud DairyNZ which offers reliable security and data discoverability features, the ability to access data with simplicity, and suits the organisation size. All scientists and students can find and access data held in Snowflake (with permission) directly or through someone in their team.
This section discusses some commonly used methods to access data from Snowflake in RStudio installed locally on your machine or hosted remotely on a server. Secure data connections described in this section can also be used for Data Science tools other than RStudio, e.g. Python. However, some simple modifications might be required in certain cases.
Never heard about Snowflake before? It’s just another SQL database like Oracle, PostgreSQL, Microsoft SQL Server, etc. Here are some Quick tutorials:
Snowflake in 20 Minutes:
https://docs.snowflake.com/en/user-guide/getting-started-tutorial.html
SQL Tutorial
https://www.w3schools.com/sql/default.asp
NOTE: before proceeding to the next step, please ensure you have your access credential sorted for the services you intend to use. Access to required services can be requested via AssistMe support ticket for the Digital Services.
3.1 Connect Rstudio with Snowflake (Windows)
Step 1: ODBC driver and connection
Install and configure the Snowflake ODBC driver for Windows. We recommend having the latest 64-bit driver installation.
IMPORTANT: Some legacy systems like MS ACCESS require 32-bit ODBC connections.
Please see this step-by-step guide install and configure ODBC Snowflake driver.
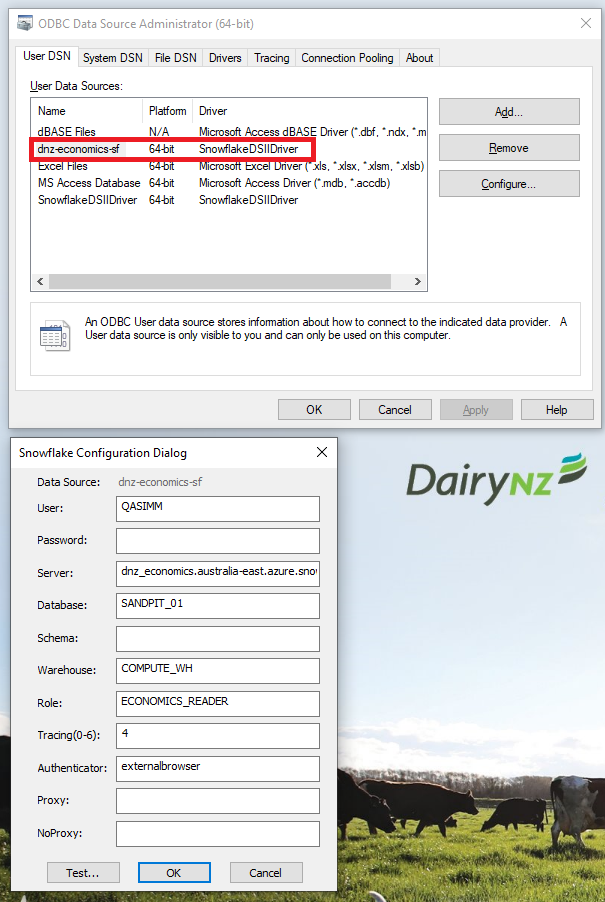
Here is how a typical Snowflake ODBC connection for Windows will look like:
Step 2: accessing Snowflake from locally installed RStudio
Now let’s open the RStudio desktop and load some necessary packages. The following code is a neat way to load packages (or install and load if any packages are not already installed).
if (!require("pacman")) install.packages("pacman")
pacman::p_load(tidyverse, DBI, odbc, dbplyr, lubridate, tictoc)
Now create a database connection with your credentials. In this chunk, username and password are entered using the Rstudio input prompt. This might not be the best way of securely handling Snowflake credentials for every usecase. There are several possible ways to secure credentials for an odbc connection with certain pros and cons. See this for details: https://db.rstudio.com/best-practices/managing-credentials/
# ODBC connection string
odbcCon <- DBI::dbConnect(odbc::odbc(),
                          Driver = "SnowflakeDSIIDriver",
                          Server = "dnz_economics.australia-east.azure.snowflakecomputing.com",
                          Database = "SANDPIT_01",
                          Schema = "PLATEMETERS",
                          Warehouse = "COMPUTE_WH",
                          UID = rstudioapi::askForPassword("Database user"),
                          PWD = rstudioapi::askForPassword("Database password"),
                          Tracing = 4)

# Test connection
paddocks <- tbl(odbcCon, "PADDOCKS") #need to specify schema above to access
paddocks

ggplot(paddocks) + geom_bar(aes(y = AREA))
NOTE: Alter Database, Schema, Warehouse and other credentials as per your access.
If all goes well by far, you have successfully fetched some data from Snowflake to RStudio. Now let’s try to push some data into Snowflake from RStudio.
For this exercise, you would need permissions to write, read, update, and delete tables in the Public Schema. Our ICT team at DairyNZ can sort your access to SnowFlake for you.
# ODBC connection string
odbcCon <- DBI::dbConnect(odbc::odbc(),
                          Driver = "SnowflakeDSIIDriver",
                          Server = "dnz_economics.australia-east.azure.snowflakecomputing.com",
                          Database = "SANDPIT_01",
                          Schema = "PUBLIC",
                          Warehouse = "COMPUTE_WH",
                          UID = rstudioapi::askForPassword("Database user"),
                          PWD = rstudioapi::askForPassword("Database password"),
                          Tracing = 4)

# Create table in public schema to write iris data
dbCreateTable(odbcCon, name = "user_table_13", fields = iris)

# Write data into your table (i.e. user_table_13 in the example)
# WARNING: overwrite = TRUE will overwrite the entire table
dbWriteTable(odbcCon, "user_table_13", iris, overwrite = TRUE)

# Now lets query data from snowflake (using cloud compute)
my_sf_table <- tbl(odbcCon, "user_table_13")

## Speed test: Snowflake compute
tic("dplyr snowflake")
results <- my_sf_table %>%
  group_by(Species) %>%
  summarise(Avg.Sep.Length = mean(Sepal.Length, na.rm = TRUE),
            Avg.Sep.Width = mean(Sepal.Width, na.rm = TRUE),
            Avg.Pet.Length = mean(Petal.Length, na.rm = TRUE),
            Avg.Pet.Width = mean(Petal.Width, na.rm = TRUE))
results
toc()

## Speed test: RStudio local
tic("dplyr local")
results <- iris %>%
  group_by(Species) %>%
  summarise(Avg.Sep.Length = mean(Sepal.Length, na.rm = TRUE),
            Avg.Sep.Width = mean(Sepal.Width, na.rm = TRUE),
            Avg.Pet.Length = mean(Petal.Length, na.rm = TRUE),
            Avg.Pet.Width = mean(Petal.Width, na.rm = TRUE))
results
toc()

## Drop the table you created in this excercise
qry <- paste0("DROP TABLE",'"SANDPIT_01"."PUBLIC"."user_table_13"')
dbGetQuery(odbcCon, qry)
3.2 Connect Rstudio (remote) with Snowflake
This process is applicable to RStudio hosted on a linux-based servers e.g. RStudio Connect, RStudio Workbench.
Here is an example.
## Load required packages and install them if they are not available
if (!require("pacman")) install.packages("pacman")
pacman::p_load(tidyverse, DBI, odbc, dbplyr, tictoc)

# DB credentials
creds <- list (database = "SANDPIT_01", schema = "ECONTEMP", uid = "QASIMM")

# ODBC connection string
odbcCon <- DBI::dbConnect(odbc::odbc(),
                          Driver = "SnowflakeDSIIDriver",
                          Server = "dnz_economics.australia-east.azure.snowflakecomputing.com",
                          Warehouse = "COMPUTE_WH",
                          Database = creds$database,
                          Schema = creds$schema,
                          UID = creds$uid,
                          PWD = rstudioapi::askForPassword("Database password"),
                          Tracing = 4)

# Some analysis with remote computation
flights_sf <- tbl(odbcCon, "FLIGHTS")

# View dataset
head(flights_sf)

# Number of flights by carrier
flights_sf %>%
  group_by(carrier) %>%
  summarize(number = n()) %>%
  ggplot(mapping = aes(x = carrier, y = number)) +
  geom_col()